Planning a market, fair, or craft show but worried about managing vendor registrations? Don't worry! I'll show you how to make it super easy using PartyLabz. To make things clear, let's walk through a real example - setting up a Christmas market with 24 tables in a community center. But remember, these same steps work great for any type of market, whether it's a farmers market, craft fair, flea market, or art show!
What We Want to Achieve
-
Let vendors apply to participate
-
Review and approve the right vendors
-
Let approved vendors pick and pay for their tables
-
Keep everything organized and professional
Getting Started: Create Your Event Website
Before diving in, let's understand what we're setting up: we want vendors to first apply and get approved, then let the approved ones choose and pay for their tables. This two-step process helps you make sure you get the right mix of vendors for your market. It's like being a DJ - you want to make sure all the songs (or in this case, vendors) work well together!
Head to PartyLabz and enter the basics:
-
Event name
-
Host info (that's you!)
-
Your email
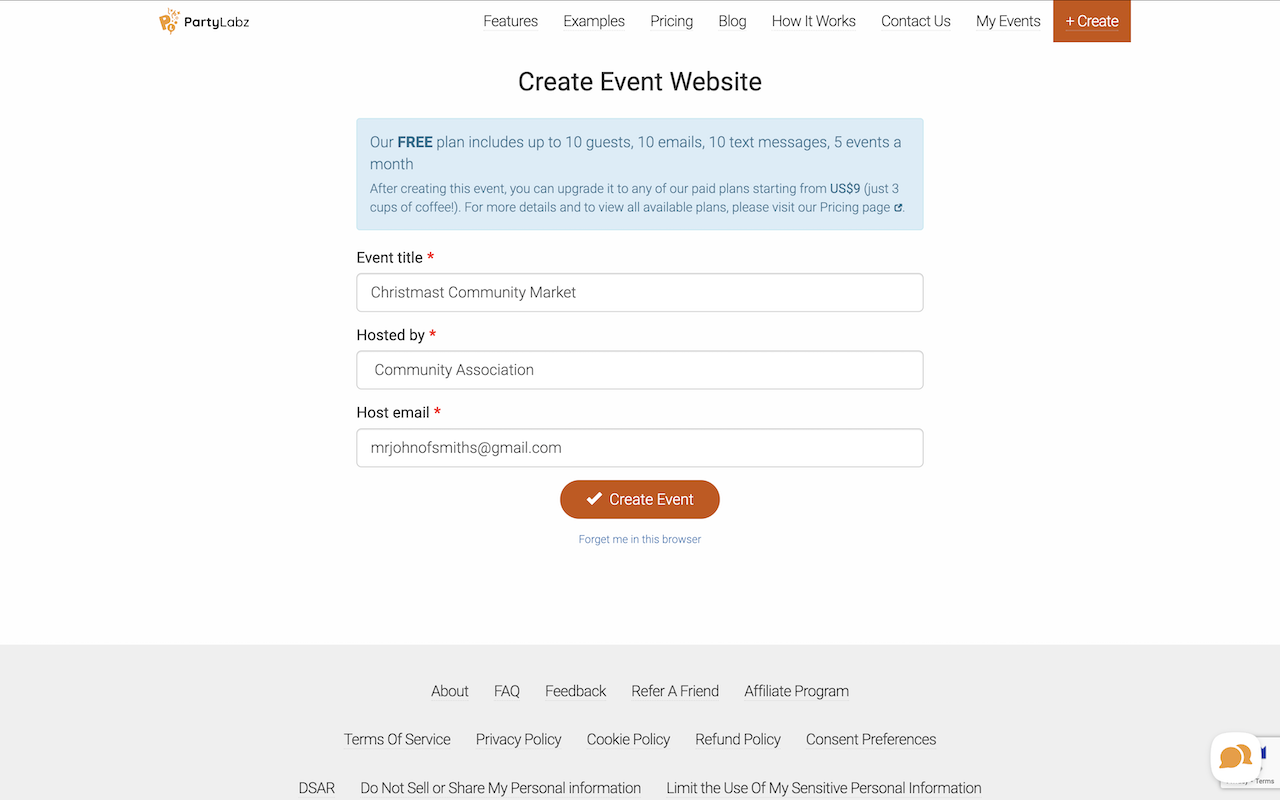
Important settings to get right:
-
Pick "Submit with Approval" in the "RSVP Options" dropdown
-
Set event capacity to 24 (matching your number of tables)
-
Set "How many people a guest can bring including themselves" to 1
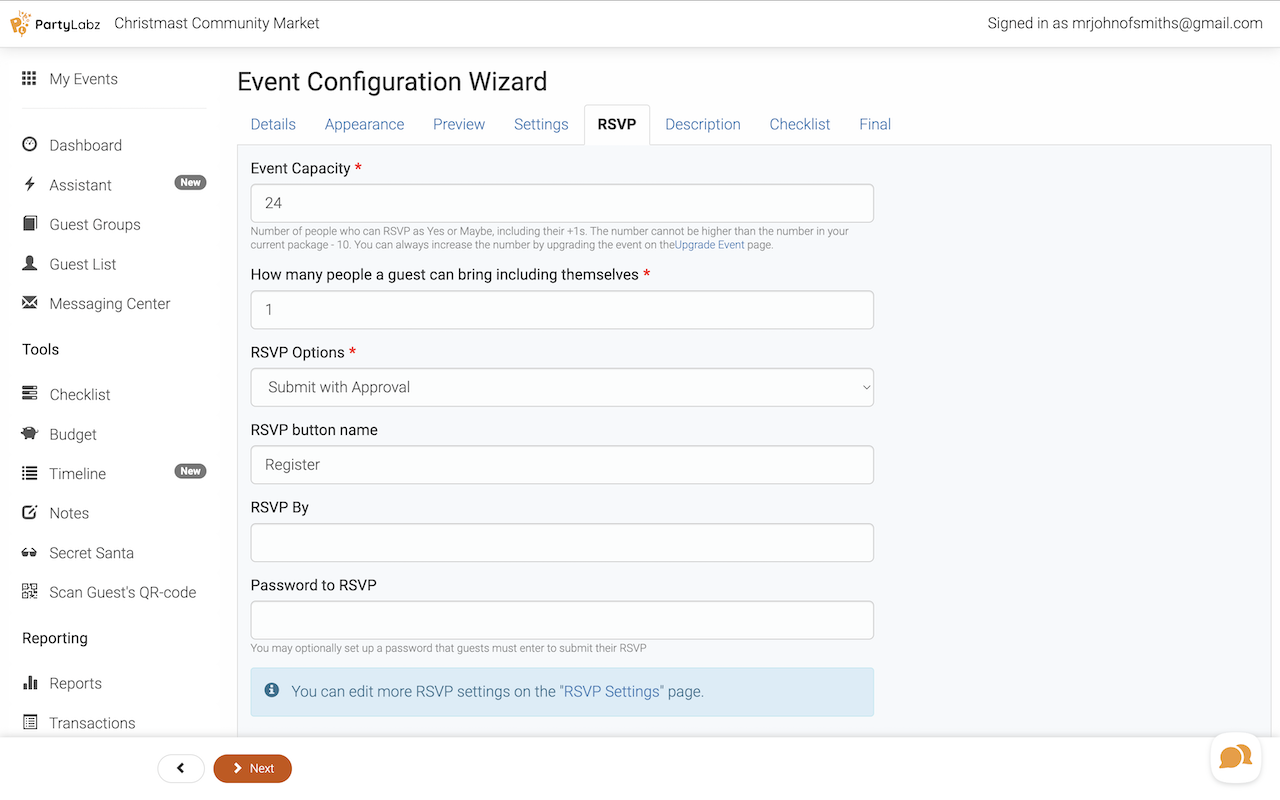
These capacity settings are super important! They make sure you don't accidentally approve more vendors than you have tables for.
Need help with the event description? The AI writing helper can create one that includes all the important details about your market.
Here's an example of what you could ask AI:
"Please write an event description for a Christmas market at the Community Center. The market will be held on December 21st from 10 AM to 4 PM. We will have 24 tables for vendors selling handmade crafts, holiday decorations, and local food products. Each vendor can have up to 2 people at their table. Vendors need to bring their own tablecloths. Some tables have access to electricity. Please include that vendors must first apply and get approved before they can select and pay for their table."
The AI will generate a well-structured description that you can then edit to match your exact needs. Pretty cool, right?
Make It Official: Upgrade Your Event
When you're expecting more than 10 vendors to register, you'll need to upgrade your event. For a vendor registration event like this, you'll need the PRO plan ($35) because it lets you customize all the important messages sent to vendors throughout the registration process. While the LIGHT plan ($9) allows basic event creation, it won't give you the message customization features that are crucial for smooth vendor communication.
To upgrade with a one-time fee:
-
Go to your event dashboard
-
Click the "Upgrade the Event" button (or select "Upgrade the Event" from the menu)
-
Select the PRO plan ($35) and click the “Pay for the Upgrade” button
-
Enter credit card information and click the “Pay” button to finalize the payment.
If you're an organization that hosts markets regularly, we recommend our BUSINESS+ subscription plan. It offers the best value with all premium features including the ability to display your company's logo instead of PartyLabz's branding, making your event pages look more professional and on-brand.
To subscribe to a plan:
-
Go to the "My Events" page
-
Click the "Subscription" menu item
-
Choose your preferred period (monthly, quarterly, or yearly)
-
Select the BUSINESS+ plan Remember, the yearly plan offers the biggest savings!
Are you a non-profit organization? Reach out to us! We offer special reduced-price plans for non-profits that give access to all platform features. We're here to support communities and make event organizing accessible for everyone.
Check out all available plans at https://www.partylabz.com/pricing to find what works best for you.
Collecting Vendor Information
Gathering the right information from your vendors is crucial for smooth market organization. By default, PartyLabz always asks for the vendor's name and email address - these are required fields that can't be disabled. But you'll probably want to know more about your vendors! That's where Standard and Custom questions come in.
PartyLabz offers two types of additional questions: Standard and Custom. Here's the key difference - Standard questions save responses directly to guest details for easy access, while Custom questions are stored separately in reports.
Standard Questions (turn these on):
-
Phone number
-
Company name
-
Address
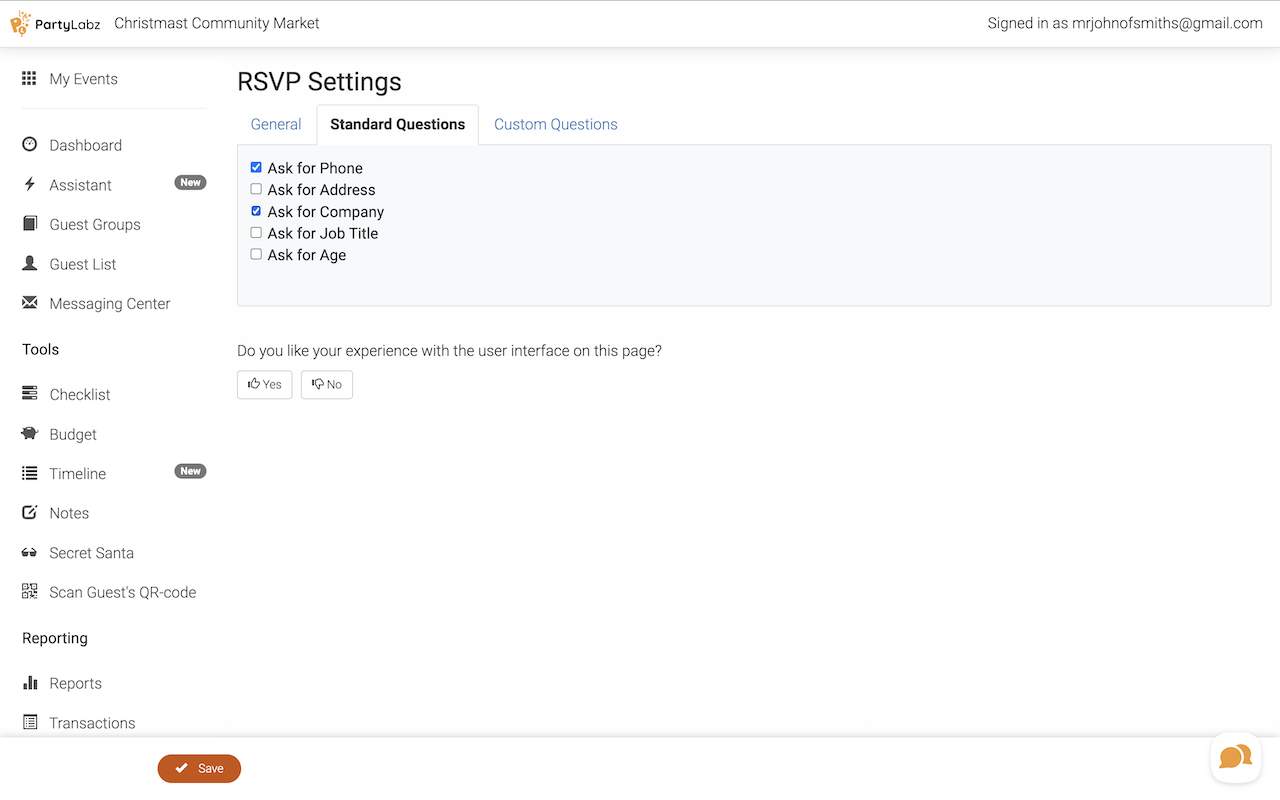
Remember: When you enable a Standard question, it becomes required for all vendors to answer!
Custom Questions (here are some examples you might want to use):
-
What are you selling?
-
Product category
-
Do you need electricity?
-
Any special requirements?
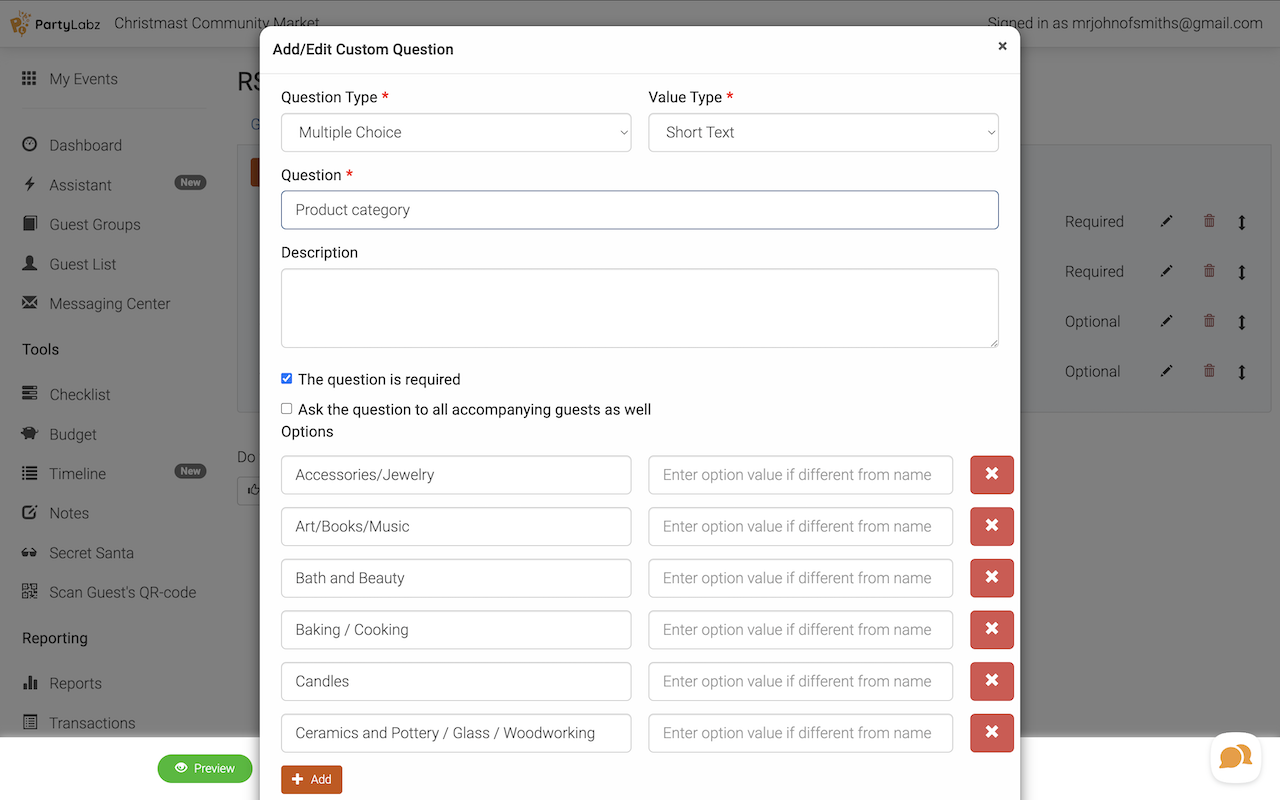
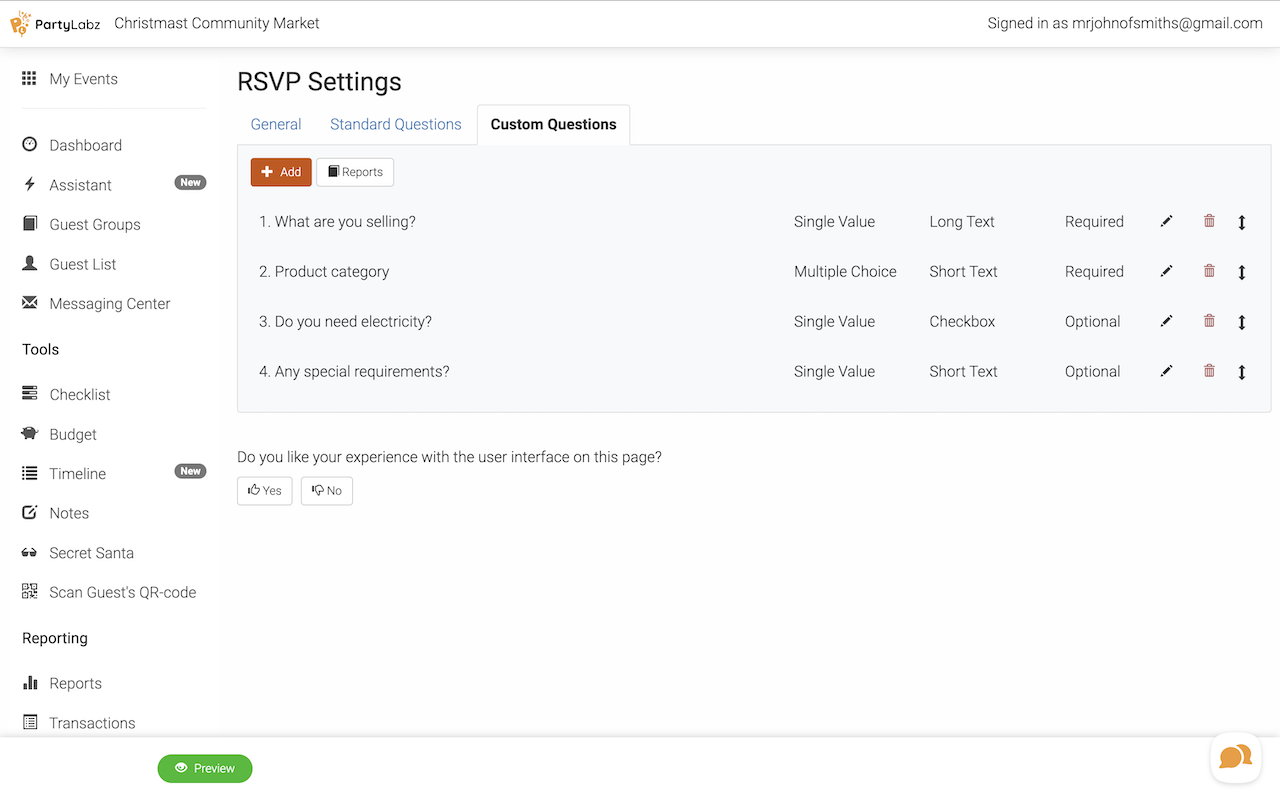
Feel free to add your own custom questions that fit your market's specific needs! This is your chance to gather any important information that will help you run your market smoothly.
Setting Up Your Table Layout
Now comes the fun part - organizing your market space! This process happens in three simple steps.
1. Create Your Signup Page
First, let's create a new page where vendors will select their tables:
-
From your event Dashboard, click "Edit Event Website"
-
Click the "Add Tab" button and select "Signup List" function
-
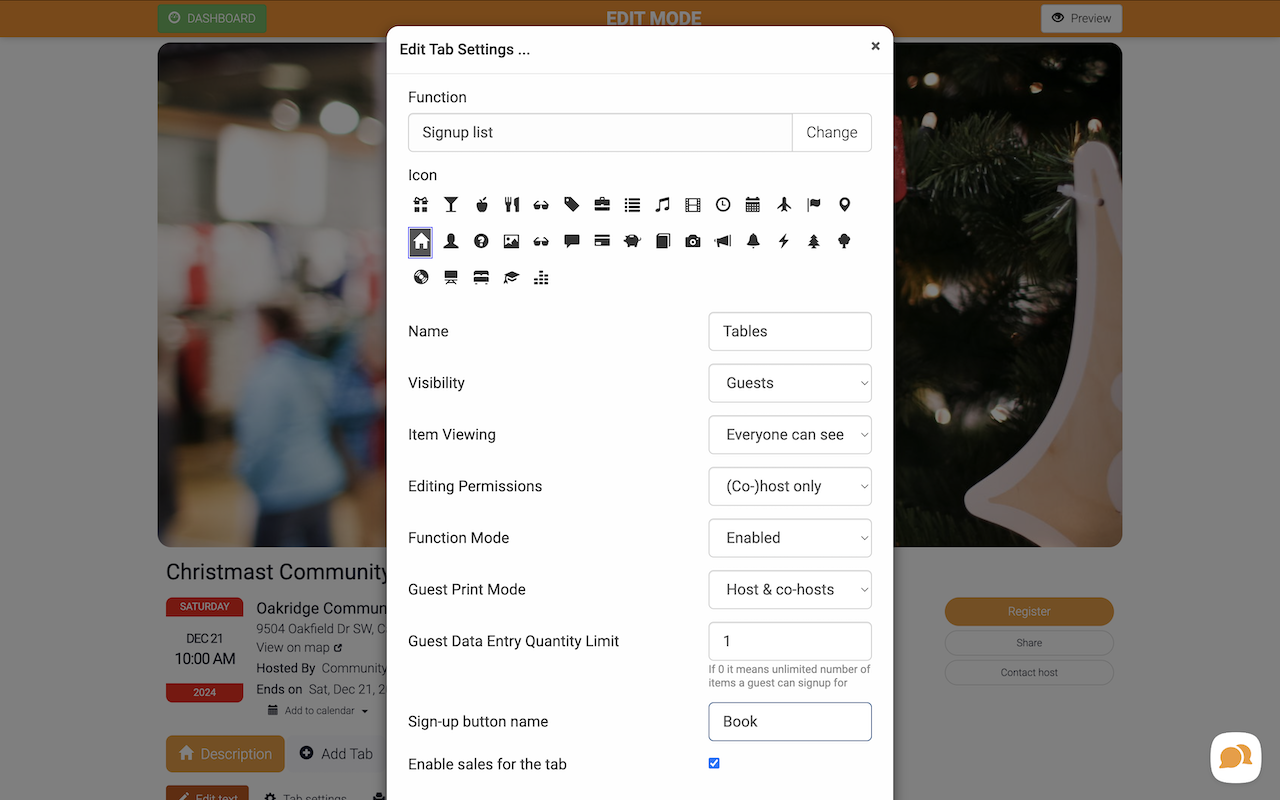
Configure the page basics:
-
Give it a name (like "Select Your Table")
-
Choose an icon
-
Turn on "Enable sales for the tab" for online payments
-
Customize your signup button text
-
Click the "Save" button to create the page
2. Add Your Tables
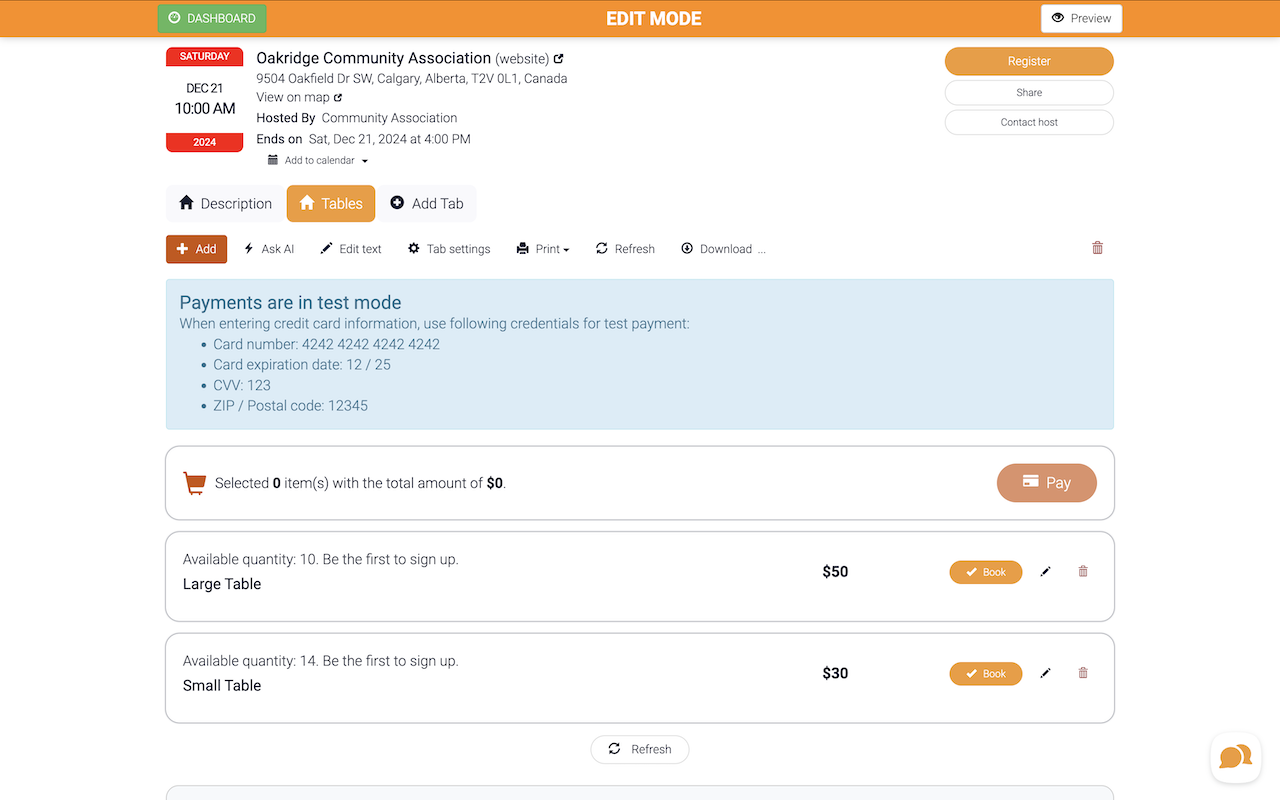
Now you need to decide how to list your tables. You have several smart options:
-
By size (like large tables vs. small tables)
-
By section (group tables by market areas)
-
By amenities (tables with/without electricity)
-
Individual tables (perfect for location-based pricing)
You can add tables in two ways:
Manually: Click the "Add" button for each table type and enter details like name, price, and quantity.
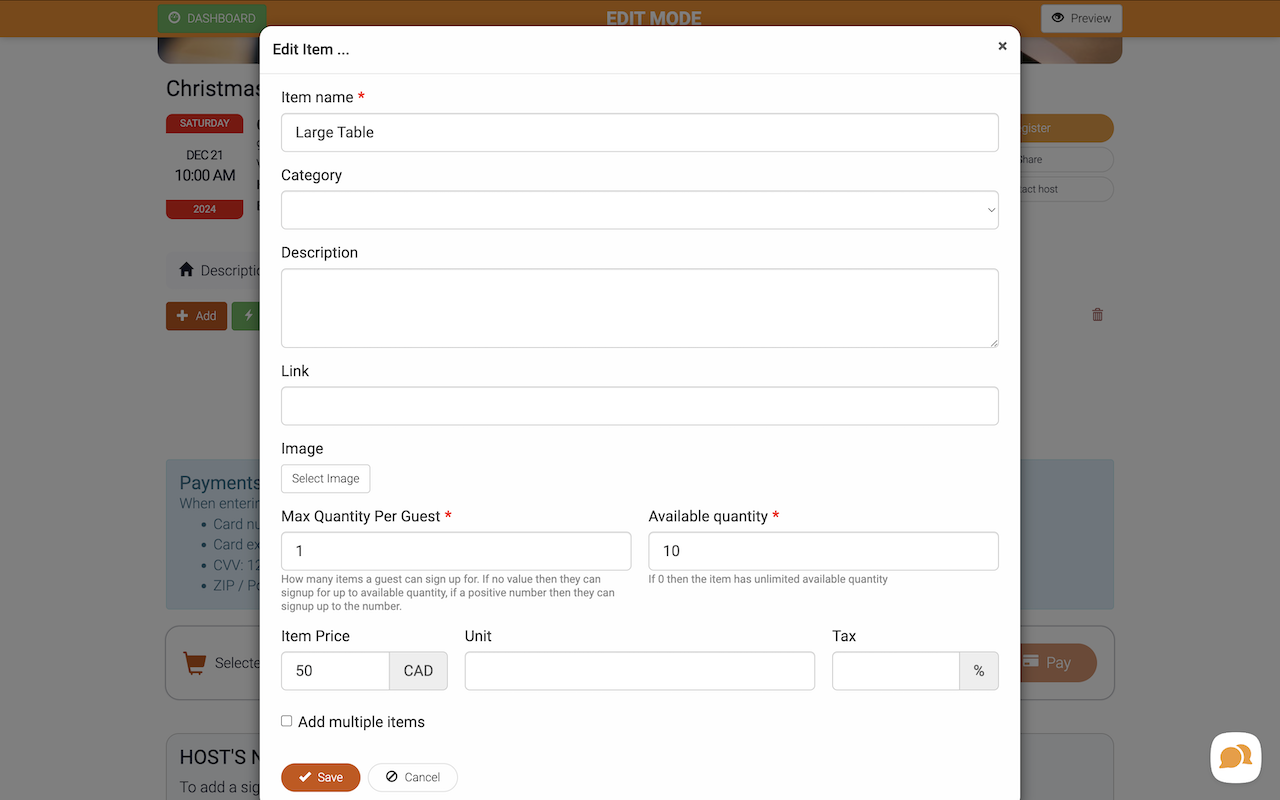
Using AI Helper: Save time by using the "Ask AI" button. Here's a sample prompt:
"Please create 2 signup list items for my market:
Item name: Large Table Description: 6ft table located along the walls. Perfect for vendors with larger displays. Available quantity: 10 Price: $50 Limit one per guest
Item name: Small Table Description: 4ft table in central area. Great for smaller crafts and displays. Available quantity: 14 Price: $30 Limit one per guest"
3. Add Page Description and Map
Finally, help vendors understand the layout:
-
Click the "Edit Text" button
-
Write a clear description of your table layout
-
Upload your floor plan map:
-
Click the image icon in the editor's toolbar
-
Click "SELECT" icon next to the Source input to open your files
-
Choose your map image or upload a new one
-
Save your changes
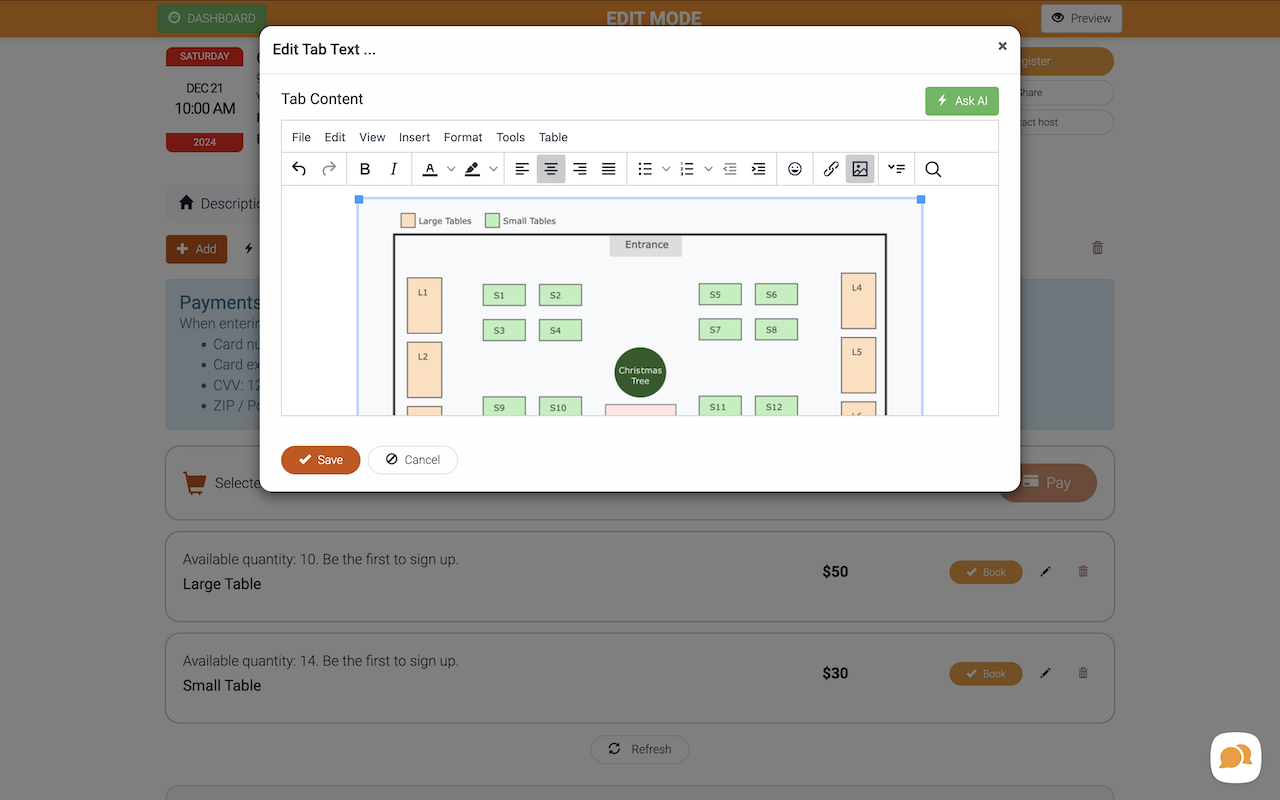
Pro tip: Make sure your description mentions any important details about table locations, like which ones have access to electricity or are closer to the entrance!
Setting Up Payments
Before you can accept payments, you'll need to set up both your Stripe account connection and event-specific payment settings. Here's how:
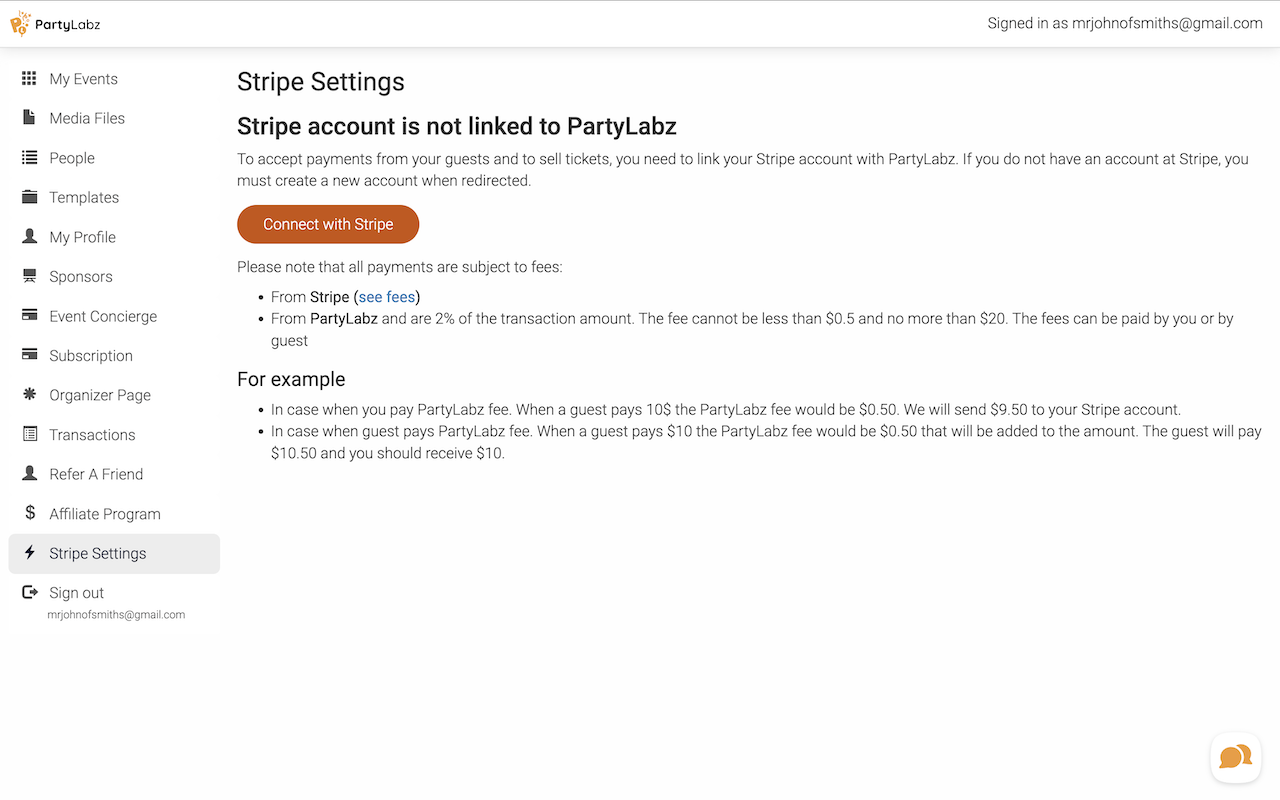
Connect Stripe (one-time setup)
-
Go to "My Events"
-
Find and click "Stripe Settings" in the menu
-
Click "Connect to Stripe" (create a Stripe account first if needed)
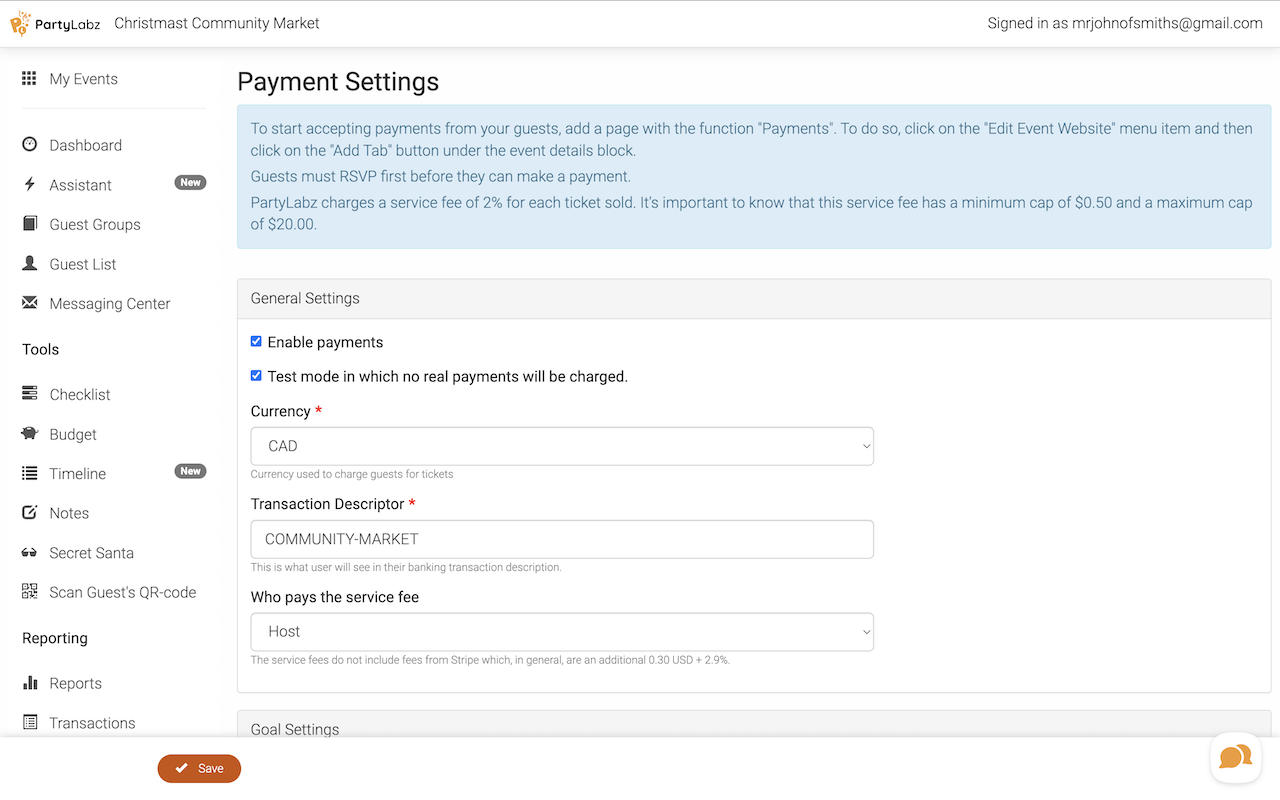
Configure Event Payments
-
From your event dashboard, find "Payment Settings"
-
Choose your currency
-
Set tax rates if needed
-
Add your payment descriptor (what vendors will see on their statement)
-
Decide who pays the service fee
-
Pro tip: Enable test mode to try out the payment process using fake credit cards first!
Customize Your Messages
Keep your vendors informed every step of the way by customizing your event messages. Here's where to find and what to update.
Go to "Custom Messages" in your event dashboard, then find and update these key messages:
-
"Message on the RSVP page" (what vendors see when registering)
-
"Message on the RSVP page for guest when pending approval" (after they apply)
-
"Email RSVP Confirmation when pending approval" (application received email)
-
"Email RSVP Approval Confirmation" (when approved)
-
"Email RSVP Denial Confirmation" (when not approved)
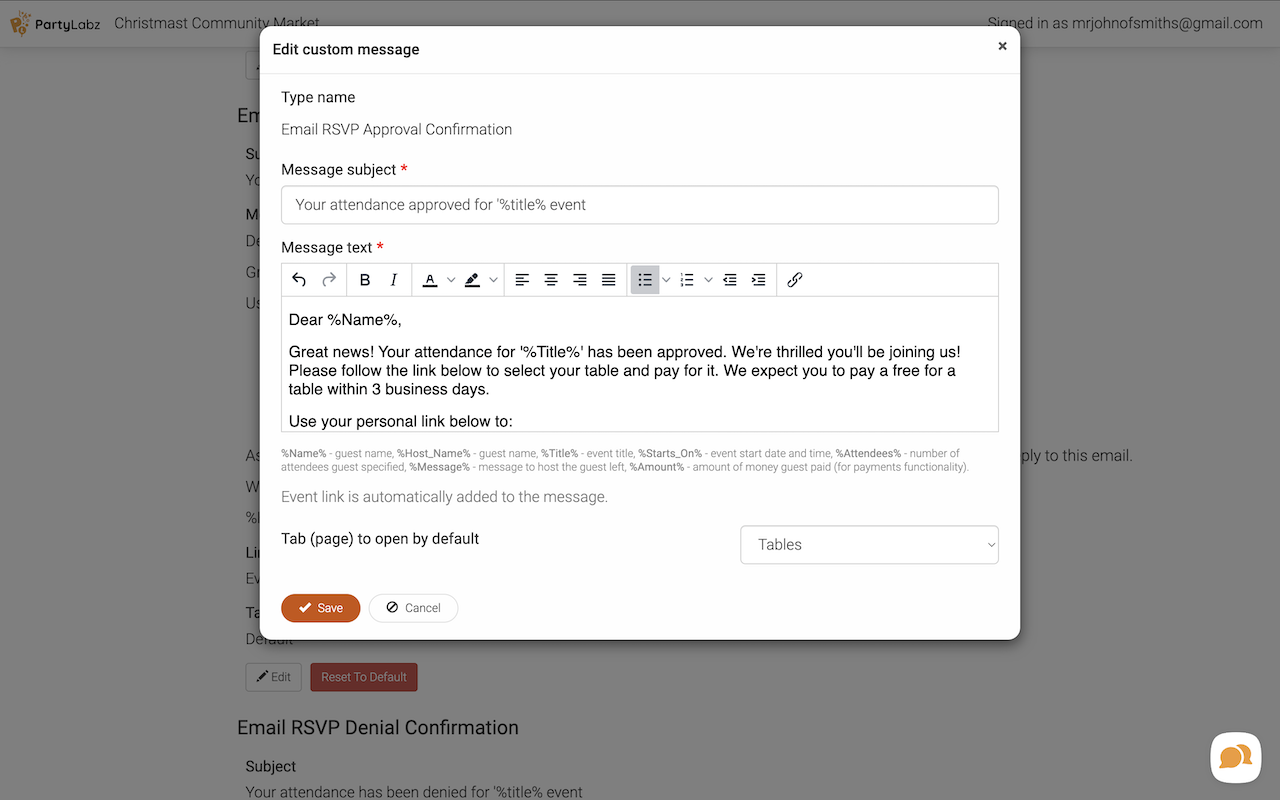
Pro tip: For email messages, you can select which page of your event website opens when vendors click the button in the email!
Testing It Out
Let's walk through the entire process to make sure everything works smoothly.
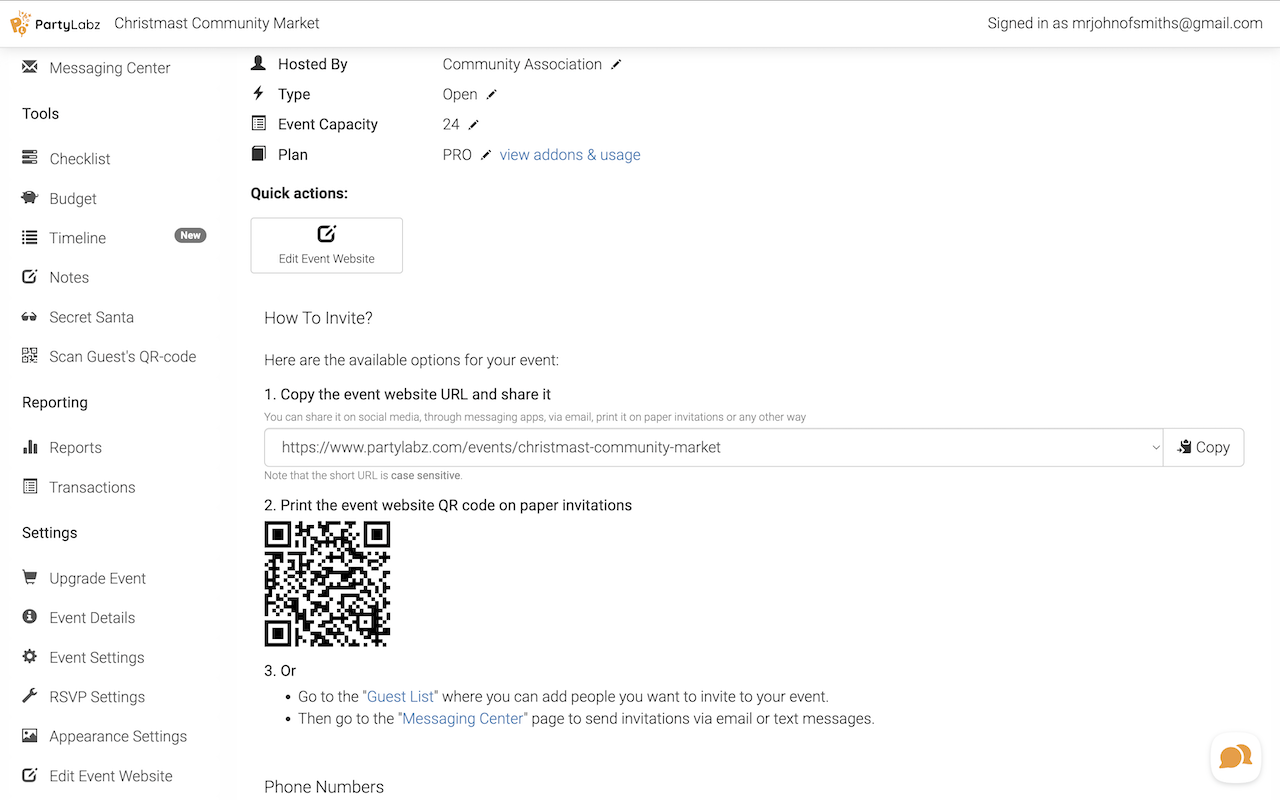
Get Your Event Link
Go to your event dashboard and click the "How to invite" button to get your event URL.
Try the Vendor Experience
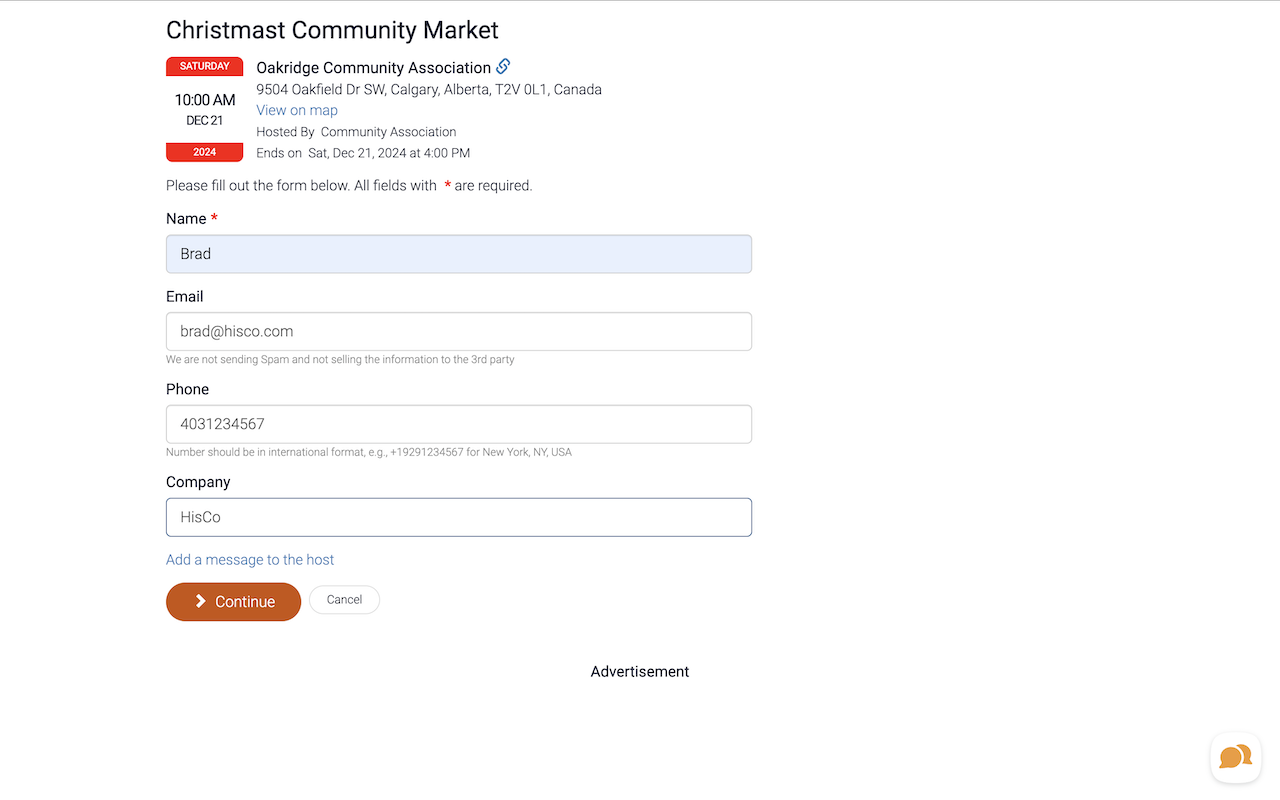
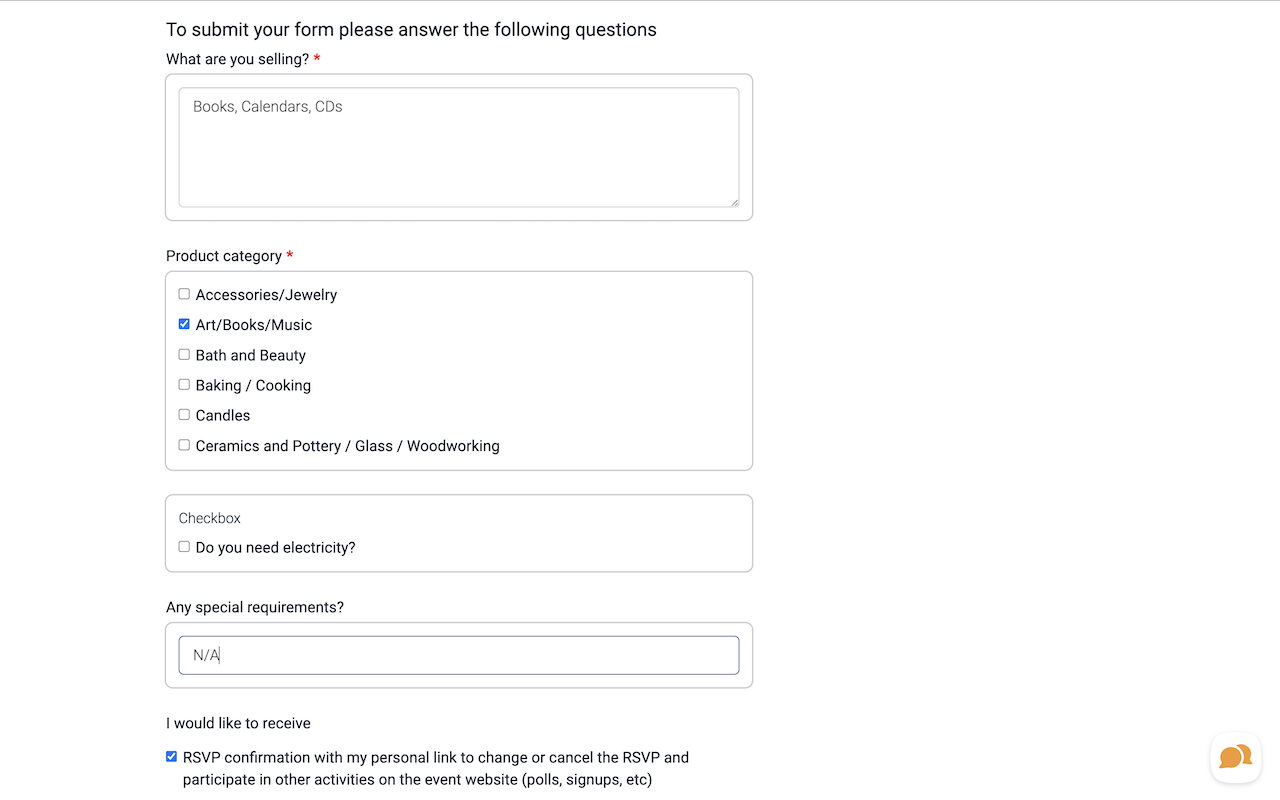
Open the URL in a new tab and go through the registration process:
-
Click the Register button
-
Fill out the application form
-
Submit and verify the pending message appears
Review Applications
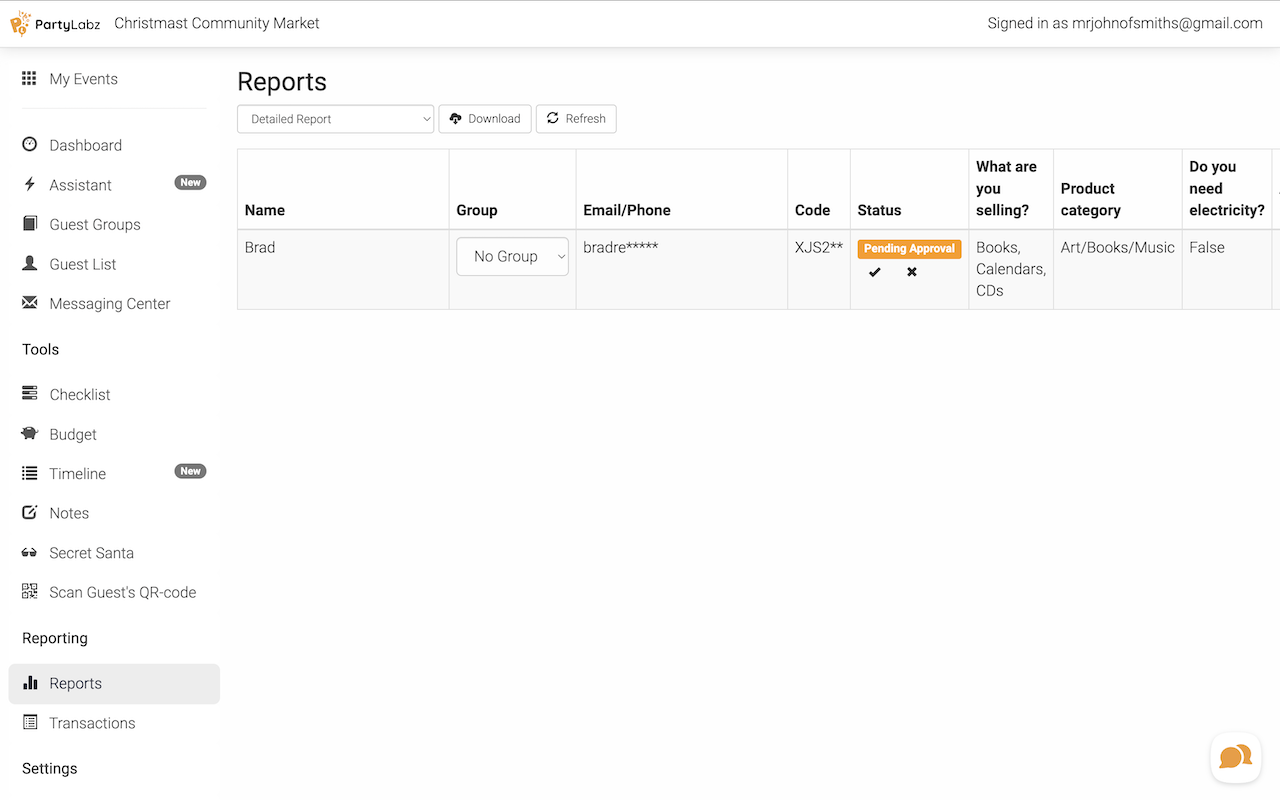
Navigate to your admin area to review submissions:
-
Check "Guest List" for basic applicant information
-
Go to "Reports" > "RSVP Questions - Detailed Report" for full application details
-
Use the check/cross icons right in the report to approve or deny vendors
Monitor Table Selection and Payments
After approval, vendors will:
-
Receive an approval email with a link
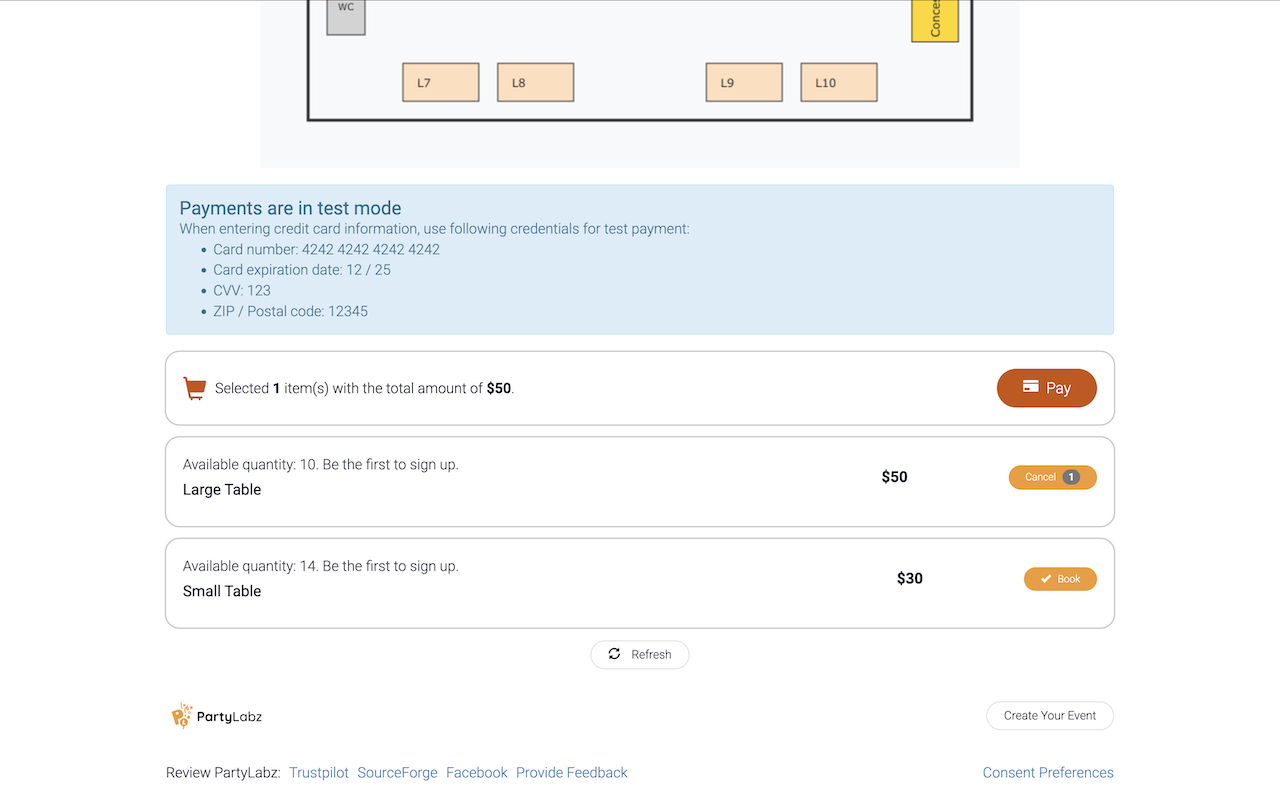
-
Choose their table and complete payment online
-
Payments go directly to your Stripe account (minus fees)
Set Up Automatic Reminders
Keep vendors on track with automatic reminders:
-
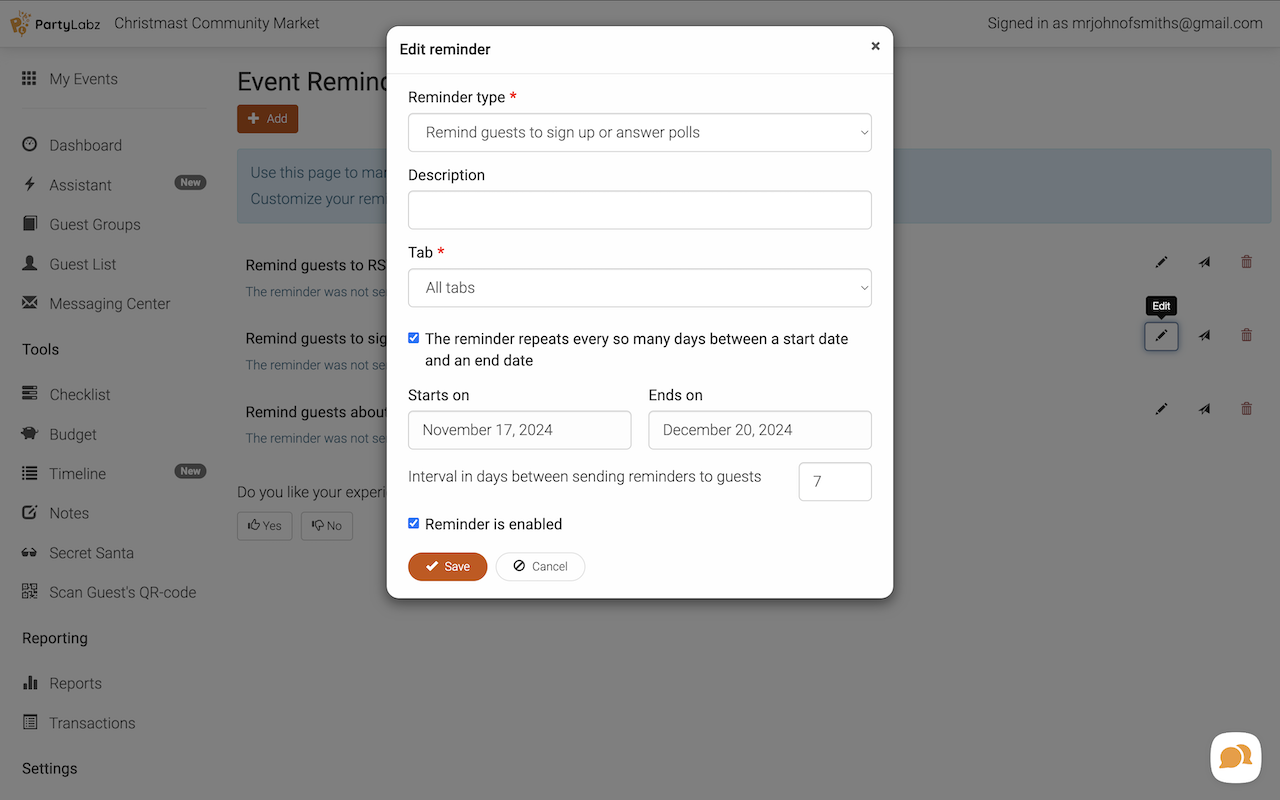
Go to the "Reminders" page
-
Find "Remind guests to sign up or answer polls" template
-
Configure your preferred timing and frequency for reminders to vendors who haven't selected their tables yet
Bonus: Managing Table Assignments
Make table assignments crystal clear by using PartyLabz's group feature:
-
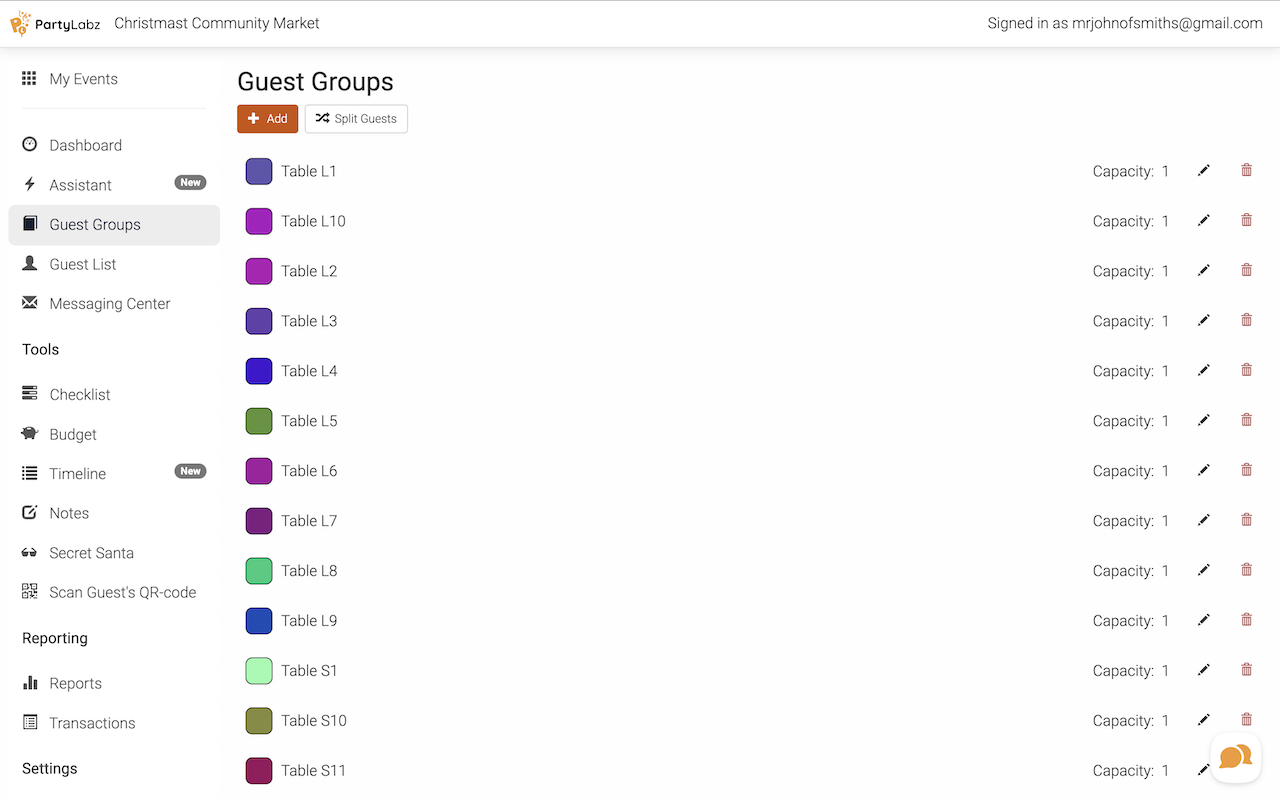
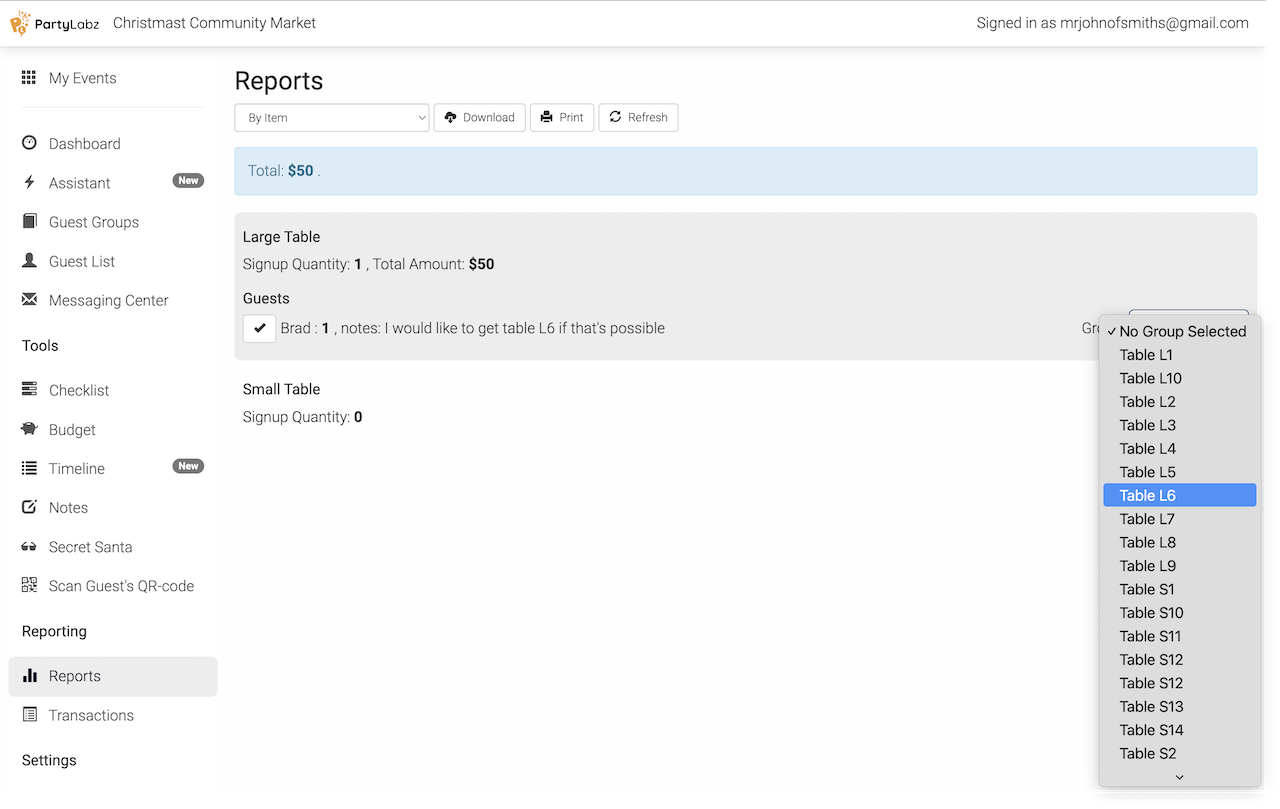
Go to "Guest Groups" and create a group for each table
-
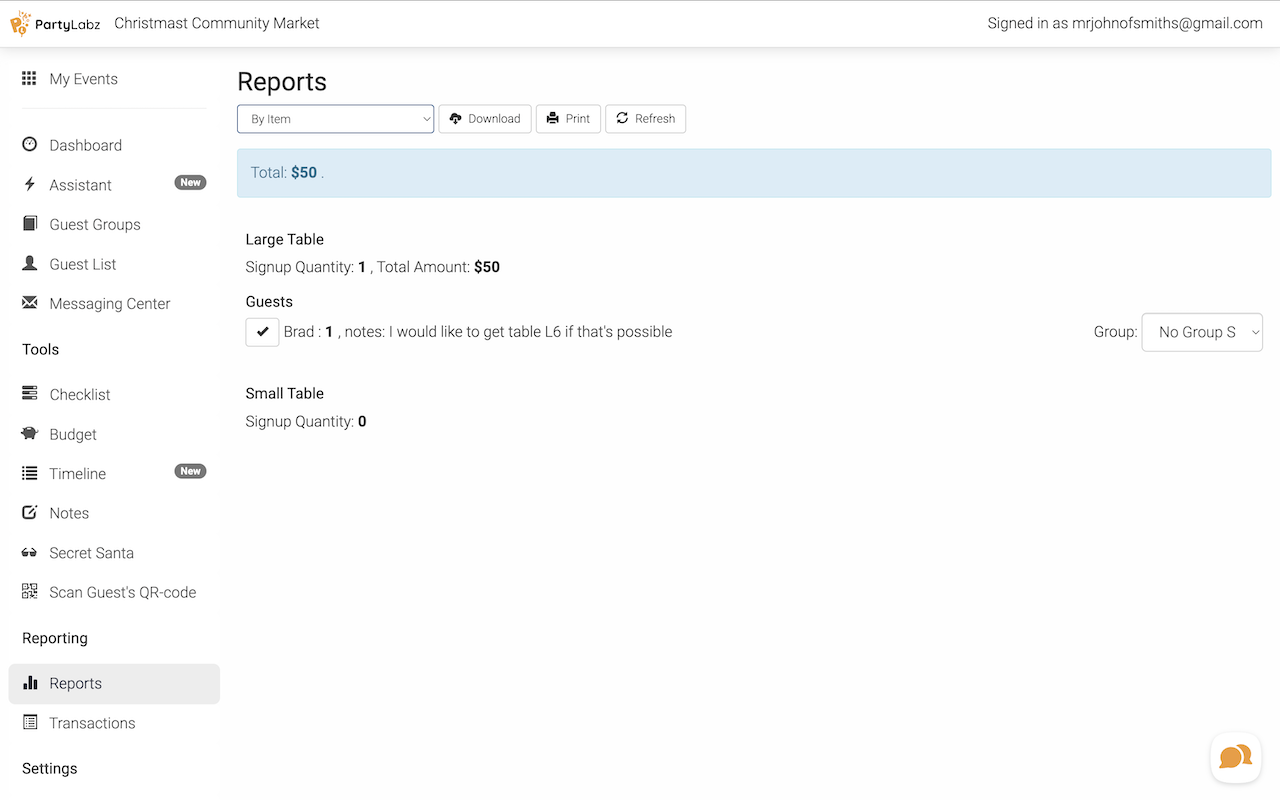
Use "Reports" > "Signup List - By Item" to see who signed up
-
Assign vendors to specific tables using the group dropdowns
-
Use the Messaging Center to notify vendors
-
Include the variable “%Guest_Group%" in your message to automatically insert each vendor's assigned table number
That's it! You're ready to run a smooth, professional market. Your vendors will love how easy it is to register and pick their spots.
Why PartyLabz Makes Your Market Organization a Breeze
Let's wrap up by highlighting why this system is a game-changer for market organizers:
Save Precious Time
-
No more juggling spreadsheets and email chains
-
Automated approval process and instant notifications
-
Easy-to-view reports with all vendor information in one place
-
AI helpers to quickly create descriptions and items
Stay Organized
-
Two-step registration keeps you in control of vendor selection
-
All vendor information stored in one secure place
-
Clear system for table assignments and payments
-
Easy communication with all vendors through the messaging center
Make It Professional
-
Clean, professional registration process for vendors
-
Secure payment handling through Stripe
-
Automated emails keep everyone informed
-
Professional-looking event website
Keep It Simple
-
Vendors can easily:
-
Apply for participation
-
Select their preferred table
-
Pay securely online
-
Get their table assignment
-
You can easily:
-
Review applications
-
Approve vendors
-
Track payments
-
Manage table assignments
Ready to make your next market a stress-free success? You can start right now - create your event for free and see how simple it can be. Want to see how other organizers are using PartyLabz? Check out our example events for inspiration!